


Step-by-Step Guide to Making a Full Lace Wig from Scratch

Full lace wigs, such as Luvmeforyou, have become increasingly popular among women of all ages and diverse backgrounds. These wigs are known for their natural-looking hairline and the wide range of styling options they offer. Understanding how to make a full lace wig allows individuals to tailor their wigs to achieve a perfect fit. Crafting a wig from scratch guarantees high quality and longevity, making it a valuable investment. Full lace wigs, particularly those crafted from human hair like the full lace wig human hair blonde, provide a lightweight and comfortable feel ideal for extended wear. This process also supports healthier hair growth by shielding natural hair from the damaging effects of heat and chemicals.
Materials and Tools Needed
Essential Materials
Lace Material
High-quality lace material forms the foundation of a full lace wig. The lace should be durable and breathable. Swiss lace is often recommended for its strength and softness. The lace material must match the wearer's scalp tone to ensure a natural look.
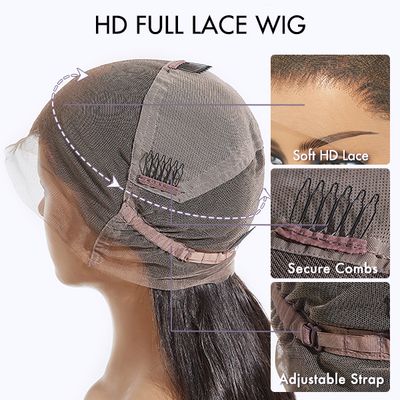
Wig Cap
A wig cap provides the base structure for the wig. The cap should fit snugly on the head to ensure comfort and stability. Choose a cap made from breathable materials to prevent discomfort during extended wear.
Hair Bundles
Hair bundles are essential for creating the wig's volume and length. Human hair bundles offer the most natural appearance and styling versatility. Select hair bundles that match the desired texture and color for the final wig.
Adhesives and Tapes
Adhesives and tapes secure the wig to the scalp. Products like Got2B Glued Blasting Freeze Spray or similar adhesives are popular choices. These products ensure the wig stays in place throughout the day without causing damage to the natural hair.
Tools Required
Wig Stand
A wig stand holds the wig in place during construction. The stand allows for easy access to all parts of the wig, ensuring precise work. A sturdy wig stand prevents movement, which can lead to mistakes.
Needles and Thread
Needles and thread are necessary for sewing the hair bundles onto the lace. Use curved needles specifically designed for wig making. Strong, durable thread ensures the hair bundles stay securely attached.
Scissors
Scissors are used to cut the lace and trim the hair bundles. Sharp scissors provide clean cuts, which are crucial for achieving a professional finish. Invest in high-quality scissors to avoid fraying the lace or hair.
Measuring Tape
Accurate measurements are vital for a well-fitting wig. A measuring tape helps take precise head measurements. These measurements guide the cutting and sewing process, ensuring the wig fits comfortably and looks natural.
Ventilating Needle
A ventilating needle is used to knot individual hair strands onto the lace. This tool allows for detailed work, creating a natural-looking hairline and parting. Practice with the ventilating needle to master the technique and achieve professional results.
Preparing the Lace and Wig Cap
Measuring Your Head
Taking Accurate Measurements
Accurate measurements ensure a well-fitting wig. Start by gathering a measuring tape and a notepad. Measure the circumference of the head, starting at the hairline and going around the nape of the neck. Record this measurement. Next, measure from the front hairline to the nape of the neck. Write down this measurement as well. Finally, measure from ear to ear across the top of the head. These three measurements will guide the lace cutting process.
Marking the Lace
Marking the lace accurately is crucial for a snug fit. Lay the lace material flat on a clean surface. Transfer the head measurements onto the lace using a fabric marker. Draw lines to indicate where cuts will be made. Ensure that all marks are clear and precise. This step will help in achieving an accurate cut, which is essential for a natural-looking wig.
Cutting the Lace
Cutting to Fit Your Measurements
Cutting the lace requires precision. Use sharp scissors to follow the marked lines on the lace material. Make sure to cut slowly and carefully to avoid mistakes. The lace should match the recorded measurements exactly. This accuracy will ensure that the wig fits comfortably and looks natural when worn.
Ensuring a Snug Fit
Ensuring a snug fit involves checking the lace against the head measurements. Place the cut lace on a wig stand. Adjust the lace to mimic the shape of the head. Check that the lace fits snugly without gaps or overlaps. Make any necessary adjustments by trimming excess lace. A well-fitted lace base provides a strong foundation for the wig, enhancing both comfort and appearance.
Ventilating the Wig
Understanding Ventilation
What is ventilation?
Ventilation involves attaching individual hair strands to the lace base. This process creates a natural appearance by mimicking hair growth from the scalp. Each strand gets knotted onto the lace, ensuring secure attachment. Proper ventilation enhances the wig's realism and durability.
Types of ventilation techniques
Various techniques exist for ventilating wigs. The most common methods include single knotting, double knotting, and split knotting. Each technique offers different benefits in terms of security and appearance. Single knotting provides a natural look but may be less secure. Double knotting offers more durability but can appear bulkier. Split knotting balances both aesthetics and strength.
Knotting the Hair
Single knot technique
The single knot technique involves tying one hair strand to the lace. Use a ventilating needle to pull the strand through the lace. Create a loop and pull the end through to form a knot. Tighten the knot to secure the hair. This method produces a natural look but requires careful handling to prevent loosening.
Double knot technique
The double knot technique adds an extra step for security. Start by pulling a hair strand through the lace with a ventilating needle. Form a loop and pull the end through twice to create two knots. Tighten both knots to secure the hair firmly. This method ensures durability, making it ideal for high-stress areas like the hairline.
Creating the Hairline
Natural-looking hairline tips
Achieving a natural-looking hairline involves strategic knot placement and density control. Use finer hair strands near the hairline for a seamless blend. Space the knots closer together to mimic natural hair growth. Avoid uniformity to enhance realism. Varying the direction of the knots also contributes to a more natural appearance.
Density and spacing
Density and spacing play crucial roles in the wig's overall look. High-density areas require closely spaced knots, while low-density areas need wider spacing. Balance density to avoid an unnatural, bulky appearance. Gradually increase spacing as you move away from the hairline. This technique ensures a realistic transition from the hairline to the rest of the wig.
Constructing the Wig
Attaching the Hair to the Lace
Securing the hair bundles
Securing the hair bundles starts with selecting high-quality hair. Human hair bundles provide the most natural look and feel. For a stunning appearance, consider using full lace wig human hair blonde. Begin by sectioning the lace into manageable parts. Use clips to hold the sections in place. This method ensures an organized workflow.
Next, thread a curved needle with strong, durable thread. Attach the first hair bundle to the lace by sewing it along the edge. Make sure each stitch is tight and secure. Continue sewing the bundle until the entire section is covered. Repeat this process for each section of the lace. This technique guarantees that the hair bundles stay firmly attached.
Ensuring even distribution
Even distribution of hair bundles is crucial for a natural look. Start by dividing the lace into equal sections. Use a ruler or measuring tape for accuracy. Attach the hair bundles to each section, ensuring that the density remains consistent. This approach prevents any areas from appearing too sparse or too thick.
For a full lace wig human hair blonde, maintaining even distribution enhances the overall aesthetic. Check the wig periodically during the construction process. Adjust the placement of the hair bundles if necessary. This step ensures that the final product looks balanced and professional.
Sewing the Wig Cap
Stitching techniques
Stitching techniques play a vital role in the durability of the wig. Use a backstitch for added strength. This method involves sewing backward and forward through the same hole. The backstitch provides a secure hold, preventing the wig cap from unraveling.
Begin by placing the wig cap on a sturdy wig stand. Align the lace with the cap, ensuring a snug fit. Start stitching from the front hairline, working your way around the perimeter. Keep the stitches close together for maximum security. This technique ensures that the lace and cap remain firmly attached.
Reinforcing the cap
Reinforcing the cap adds extra durability to the wig. Focus on high-stress areas such as the hairline and nape. Use additional stitches in these regions to prevent wear and tear. For a full lace wig human hair blonde, reinforcement is especially important due to the lighter color, which can show imperfections more easily.
Apply a thin layer of adhesive along the seams for added security. Allow the adhesive to dry completely before proceeding. This step ensures that the wig cap remains intact during daily wear. Regularly inspect the wig for any signs of damage. Promptly repair any loose stitches to maintain the wig's integrity.
Styling and Finishing Touches
Cutting and Shaping the Wig
Trimming Excess Lace
Trimming excess lace ensures a natural hairline. Use sharp scissors to cut the lace close to the hairline. Avoid cutting too much lace, as this can compromise the wig's fit. Hold the lace taut while cutting to achieve a clean edge. This step enhances the wig's seamless appearance.
Shaping the Hair
Shaping the hair involves customizing the wig to suit personal preferences. Use professional shears for precise cuts. Start by wetting the hair slightly with water or a leave-in conditioner spray. This helps in distributing the product evenly. Trim the hair in small sections to maintain control. For a layered look, cut at an angle. Regularly check the progress in a mirror to ensure symmetry.
Adding Final Details
Bleaching the Knots
Bleaching the knots creates a more natural scalp appearance. Prepare a bleach mixture according to the product instructions. Apply the bleach to the knots using a small brush. Ensure even coverage without oversaturating the lace. Allow the bleach to process for the recommended time. Rinse thoroughly with cool water to remove all traces of bleach. This step lightens the knots, making them less visible against the scalp.
Customizing the Hairline
Customizing the hairline enhances the wig's realism. Pluck individual hairs along the hairline using tweezers. Focus on creating a gradual transition from the forehead to the wig. Avoid over-plucking to prevent bald spots. Use a wide-tooth comb to gently brush through the hairline. Spritz some hairspray formulated for wigs to set the style. This final touch ensures a polished and natural look.
Crafting a full lace wig from scratch involves several detailed steps. The process includes preparing the lace and wig cap, ventilating the wig, constructing the wig, and adding final touches. Each step requires precision and patience to achieve a professional result.
For maintenance, regular cleaning and proper storage extend the wig's lifespan. Use gentle shampoos and conditioners designed for wigs. Store the wig on a stand to maintain its shape.
Making your own wig offers customization and satisfaction. Beginners should not feel intimidated. Practice and persistence lead to improvement.
FAQs:
How to fix loose knots? Retie using a ventilating needle.
How to prevent shedding? Reinforce high-stress areas with extra stitches.


